How to Make Welded Angle Iron Palisade Panels

Usually, when you’re thinking about installing a palisade fence, you’re thinking of roll-formed palisade profiles like D-section palisade pales or W-section palisade pales.
However, there is another option: angle iron – and when you manufacture welded angle iron palisade pales yourself, you have total control over the design and quality of the finished product. Let’s take a closer look at what angle iron palisade panels are and how you can make them yourself.
The Pros and Cons of Welded Angle Iron Palisade Panels
We’re going to get to the step-by-step process of manufacturing welded angle iron palisade panels in a moment, but before we do, it’s important to understand the pros and cons of this kind of fence system.
On the plus side, angle iron is readily available, so it’s easy to purchase the materials for this type of palisade fence, and you don't have to purchase roll-formed pales.
Angle iron is also very strong, and when it’s also welded into a panel, it’s a lot stronger than a similar panel that is bolted together.
The downside to welded angle iron palisade panels is that these kinds of panels do not follow contours like bolted palisade systems do. So you will need to step your fence on slopes or manufacture panels at different angles for sloped parts of your fence line.
If you’re not used to welding this kind of panel, it can also take a lot longer to get set up, and that will increase the labor costs. There might also be a wait to get your panels hot dip galvanized, which could slow down production.
Now that you know the most important pros and cons of welded angle iron palisade panels, let’s take a step-by-step look at what you need to do to produce them.
The Step By Step Guide to Manufacturing Angle Iron Palisade Panels
If you have a well-equipped metal workshop and welding equipment, it should be relatively easy to manufacture this kind of angle iron palisade fence yourself. Here’s what you will need to do.
1. Choose and Source Your Materials
The first thing you need to do when you’re planning to manufacture welded angle iron palisade panels is choose and source your materials.
Not only will the materials you use affect the weight of the panels (and therefore also hot dip galvanizing and color coating costs), but you also need to be sure what lengths are available in your chosen materials so that you can minimize offcuts and waste.
Usually, horizontal rails for welded palisade panels are larger than the pales themselves, so keep that in mind when you’re sourcing materials for your panels.
2. Design Your Panels
Palisade panels always have at least a few common traits – including pales and horizontal rails, but the finer details of the design could be influenced by many different factors. Some of our top design tips include:
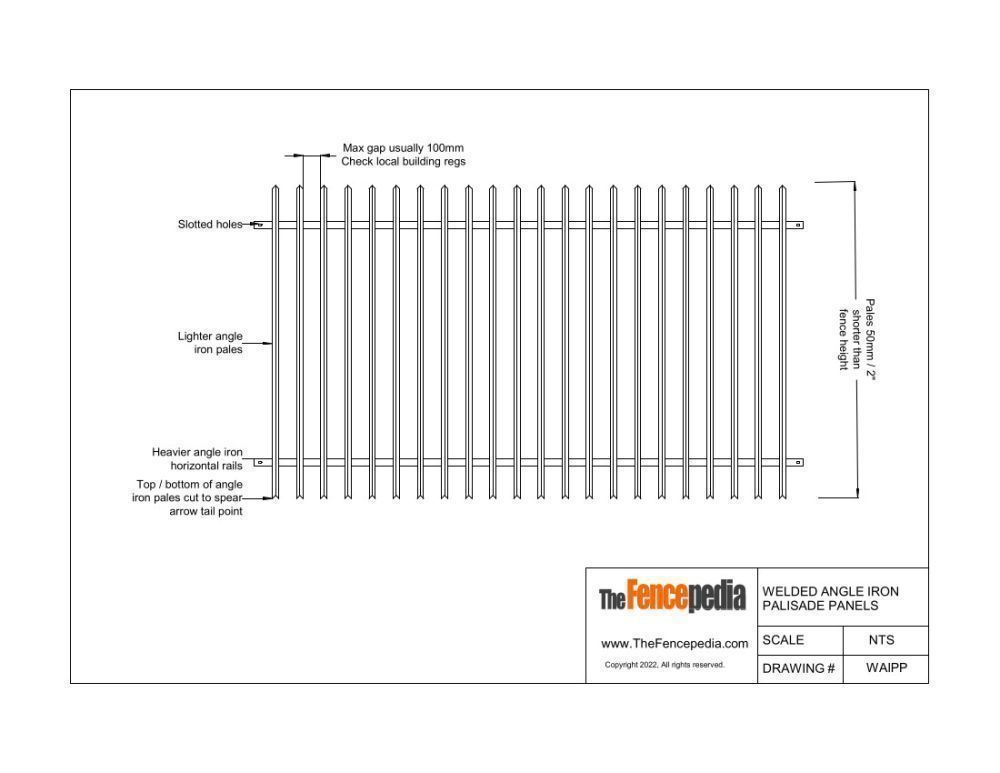
- Use slotted or oval holes in the ends of your horizontal rails instead of round, drilled holes. This will allow you to make minor adjustments on-site and give you a little more leeway when installing your panels.
- Check local building regulations to get the minimum spacing between your pales. In most places, this will be around 100mm or 4 inches, but it may be different in your city or area. You can also decrease this if you want to make the fence “puppy safe.”
- Find out what size your local hot dip galvanizers can accommodate in their zinc baths. These do differ in size, so you want to ensure your panels will be an easy fit.
- While you’re designing your panel, be sure to calculate the theoretical mass of the panel. You can find the mass of all kinds of steel on your steel supplier’s website or ask them for it when you place your order. This will help to ensure that your panels are light enough to handle on-site.
- Consider shipping issues too. Longer panels might be easier to install and require fewer posts, but they might not fit so easily on a truck or transport vehicle.
- If you do need to step your fence, you might want to consider designing panels to be shorter so you don’t have to cut or modify them on-site.
Once you’ve designed your panels, you should be able to do a complete material take off and place your order. Remember that it might take a little time to deliver all of your materials, so order them as soon as possible. Try to choose commonly used steel sizes too. The last thing you want is to be stuck waiting for a special order item!
Download Welded Angle Iron PalisadeDrawings
-
Welded Angle Iron Palisade JPG
DownloadDownload this file FREE!
Take me to my files! ×To make sure you're a human and not a bot, please enter your email address below.
-
Welded Angle Iron Palisade PDF
DownloadDownload this file FREE!
Take me to my files! ×To make sure you're a human and not a bot, please enter your email address below.
3. Make Your Jigs
The next thing you need to do in the process of manufacturing your own welded angle iron fence panels is to make jigs.
Jigs are basically templates that are used in fence manufacturing to make it quick and easy to do repetitive tasks.
You might need to create cutting jigs, so you can cut rails and pales to size quickly.
You can also create a welding jig that makes it easy to slot materials into the right position to be welded in place.
Making jigs for fence manufacturing makes it a lot easier to create uniform results and speeds up the manufacturing process.
4. Make the Panels
Once you’ve got a design, made your jigs and had your materials delivered, you still need to make your fence panels.
Usually, the best way to do this is to create an assembly line. So set up your cutting stations, and start cutting all of your pales and rails to size. Then use your punching jig to make the holes in all of your rails.
Finally, use your welding jig to place and weld all the components together.
5. Hot Dip Galvanizing
You could use pre-galvanized steel to manufacture welded palisade panels – if you can find it. However, the type of material that is usually available pre-galvanized is usually not as strong, and you will have to spend more time preparing to weld and treating welds afterwards.
Manufacturing welded palisade fence panels from pre-galvanized material will also not give you a fence system that is as corrosion-resistant. So, we strongly recommend that you weld your panels from black, untreated steel and then have them hot dip galvanized.
This is done by dipping your completed panels into molten zinc in a galvanizing facility.
Building your panels with slotted holes already made in the rails makes it easier for your panels to be dipped, and because it’s made of solid sections and not tubing, there’s less chance of “pickling” or your panels bending due to the heat of the galvanizing bath.
If you plan to paint your fence panels after they are galvanized, be sure to ask the galvanizers for a non-passivated finish. This will omit the greasy layer on the surface of the panels and cut a few steps out of the painting process.
Choosing Posts for Welded Palisade Fence Panels
Manufacturing your own welded angle iron palisade fence panels is a big part of the process of building a custom palisade fence system, but you still need to choose your posts.
Some of your options for palisade fence posts include IPE or I-beam posts with fishplate brackets, or you could choose square tubing posts with welded or bolt-on brackets. Generally, the heavier your palisade panel is, the heavier-duty you want your posts to be.
