How to Build a Wood Fence Gate

Wood fence is one of the most popular fence types in North America, for several reasons. It looks great, for one thing, and offers a high level of privacy. It’s also made from one of the most abundant resources we have, and it can be built from materials bought from most hardware stores.
However, if you’re not a fence pro (or not a wood fence pro!) you might still wonder how to build a wood fence gate. Here’s what you need to know.
Choose the Right Location
Sometimes, your property and existing fences dictates where you can install a gate, however, if you have the option, finding the right location for your wood fence gate will make building and using it a lot easier.
The best place to put any gate is as flat as possible. While you can install gates on slopes, it often means you have a larger opening under the gate to accommodate the elevation change, or that you can only open it in one direction, because a slope on the other side prevents it from swinging.
You also need to make sure that there’s nothing obstructing the swing of the gate. This could prevent you from making your gate the full size of your opening and may require you to install a fixed panel alongside the gate.
If you are also installing wood gate posts, you should look for a location that will be easy to excavate for concrete bases. This is also a good time to have locators come in and confirm that there are no underground services that might interfere with digging and installation.
Get Your Measurements
You know the old saying “measure twice, cut once?” That really does apply when you’re learning how to build a wood fence gate!
There are several dimensions you will need to get, including:
- The location of your gate posts, although this is one of the most flexible dimensions when it comes to wood gates – usually, you will install your wood posts first, and then confirm the gate measurements on site
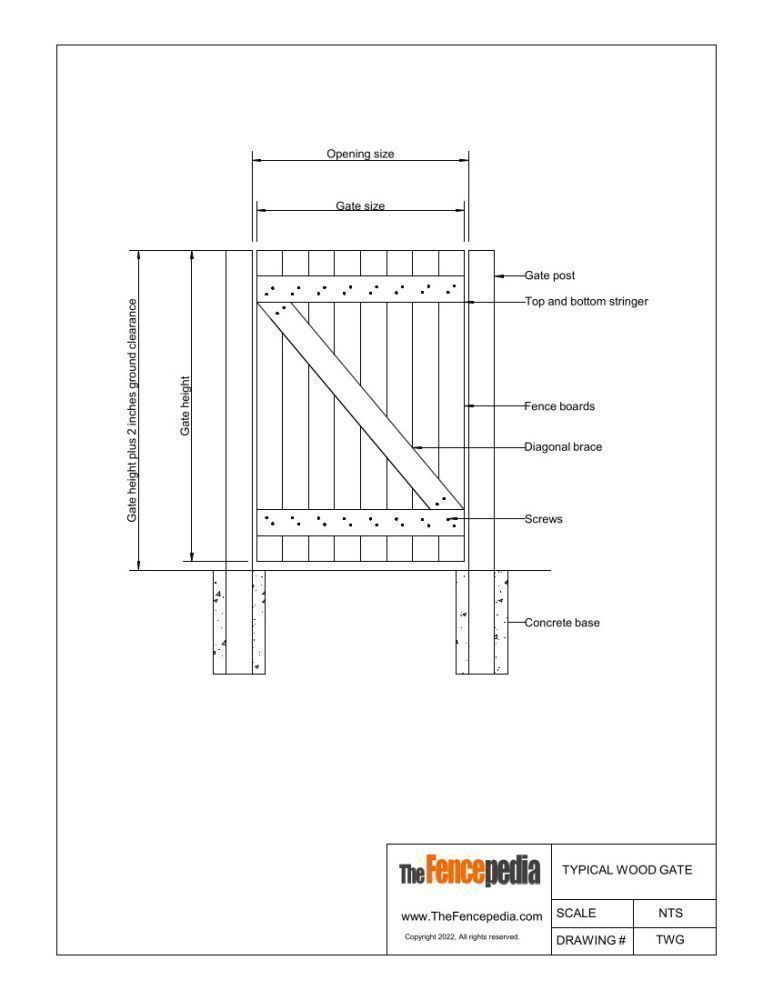
- The opening size, which is the measurement between the inside face of one gate post to the inside of the other gate post
- The gate size, which is smaller than the opening size by an inch or two to allow for hinges and latches – it’s a good idea to choose your wood gate hardware before you calculate this, as different types of hinges and latches have different spacing requirements
You can download the typical wood gate design drawing at the end of this article and use it to mark down your measurements and other information.
Choose Your Materials
If you are not planning to stain your wood fence gate, you should opt for treated wood or cedar, both of which hold up much better to the elements and to insects that sometimes invade wood fences and gates.
If you do use treated wood, you will also need to get screws that are coated for use with this kind of wood. Ordinary, uncoated screws will corrode much faster if you use those.
If you choose to use regular spruce or another untreated wood, staining and treating the wood is a must, but remember that you will need to do regular maintenance too, so very often, any money you save now will be spent later!
Gate Hardware Options
The good news if you want to build your own wood fence gate is that most hardware stores and even online shopping sites have plenty of hardware options. Some of the better options include:
Double Gate Hardware KitsDouble gate hardware kits for wood gates inlcude hinges, latches and drop bolts, which is everything you need to hang and use your gate. Most gate hardware kits include some information about the maximum size and weight of the gate that it can be used on, so be sure to check that and choose accordingly!
|
||
Single Gate Hardware KitsSingle gate hardware kits for wood fence gates usually include hinges and a latch. Typically, these kinds of kits might include either auto closing hinges or "slam lock" latches, or both. |
||
Gate Kits with CornersSome gate kits not only include hignes and latches, they also come with a complete frame and corners, so all you need to do to build your wood fence gate is attach the boards and hang the gate. |
Do a Material Take Off
Now that you know the dimensions of your gate, the next thing you need to do is do a material take off, so you can buy the materials you need to build your wood gate. Here are a few tips for this part of the process:
- Divide the width of the gate by the width of the fence board you will use to build your gate. So, for instance, you might divide 48 inches by 6-inch-wide boards, which will give you 8 boards. Remember, however, that fence boards aren’t exactly 6 inches wide. They’re usually about 5.5 inches, after they’re cut and finished.
- Calculate how many top and bottom stringers you will use. These will be the width of each leaf of the gate, so if you have a double leaf gate, remember to allow stringers for the top and bottom of both sides.
- Calculate the length of the diagonal brace as pictured on our typical design drawing. You can use Pythagoras for this.
- Allow 8 to 10 screws for each fence board you will use to build your gate, and make sure they’re shorter than the thickness of the two boards
- Allow two hinges per gate leaf, and one gate latch. If you are building a double wood gate, you might also want to include drop bolts for each leaf, so that you can hold it in the open and closed position. You can also look for self closing hinges or a gate spring if you want your gate to close automatically.
Don’t forget to buy your gate posts too and remember that you will need to buy concrete to install the posts. Most hardware stores sell bags of ready mixed concrete. You just need to add water and mix it to use it for your posts.
Check Your Tools
There are several tools you will need to use to build your wood gate. If you’re wondering how to build a wood fence gate, you’re probably fairly handy, so you might have these on hand already. If you do need to get any tools you don’t have, many hardware stores also rent equipment, so you don’t need to buy tools you don’t already own.
- A saw and a miter box – this will make cutting any angles a little easier
- Sawhorses or a table saw, which is not strictly necessary, but certainly makes cutting a little easier!
- A spirit level to make sure your posts and your gate are plumb and level
- Cordless drills and screwdrivers, plus spare batteries
- A ladder, especially if your fence is 6’ high – working above shoulder level to screw fence boards to the top stringer is not arm friendly!
- C clamps, to clamp the gate components together while you’re screwing them in place
- A steel square, which is invaluable for ensuring your gate corners are perfectly square
It’s also a very good idea to have someone to help you build and hang your gate. This is not really a job that one person can usually do!
How to Build Your Wood Fence Gate
Once you’ve got all your materials and tools ready, the actual building of your wood fence gate is fairly simple.
Ensure that your fence boards are cut to the right size, then measure the distance from the top and bottom of each board to the horizontal stringer. Clamp the boards in place and use the screwdriver to drive screws through the stringer, into the fence board. You don’t have to use four screws per board, although more fasteners help to ensure your gate stays strong and sturdy.
Repeat this process with each board, top and bottom, making sure that you use your square and level to check that everything is aligned correctly.
Once the top and bottom stringers are in place, and if you plan to use a diagonal, barn door style brace, you can lay it in place, mark it, cut it, and screw it in place too.
How to Hang a Wood Fence Gate
The first thing you need to do to install a wood fence gate is install your posts in concrete, and then leave them in place for a few days to a week, so the concrete can dry and start hardening.
Check that your posts are plumb (vertical) and level (set to the same height) while the concrete is wet though. Once it’s hardened, there’s no fixing a skew post!
Don’t be too worried if you need to trim a little off the top of the posts once they’re installed. This is fairly common with wood fences and gates.
Attach the hinges to the top and bottom stringer, and then have the person who is helping you hold the gate in place while you fix the top hinge in place. Usually, it helps to have something wedged under the bottom of the gate to hold it to the correct height, so you only have to worry about holding it still in one dimension!
Get one screw into each hinge as quickly as you can, checking that the gate is level before you fasten the bottom screw. Once they’re in place, you’ll have extra time to fasten the other screws.
Once the hinges are in place, all that’s left is to position and attach the gate latch.
Ready Made Wood Fence Gates
Sometimes, you can buy ready made wood fence gates from hardware stores and similar suppliers, however, like most off the shelf gates, sizes are limited. So, if you need a gate to fit a specific opening, building it yourself is usually the best advice.
How Hard Is It to Build a Wood Fence Gate?
Building and hanging a wood fence gate is not the hardest carpentry project you will ever face, and most people who are reasonably handy can get it done in a day once they have all the tools and materials they need.
However, if you don’t know your way around carpentry tools, and you’re not confident that you can do a good job, it might be worth it to hire a pro. There are lots of wood fence installers in every city and town in North America, so it’s not hard to find one that can help!
In the meantime, download our wood fence sketch, so you can mark them up to tell them what you need, what size gate you want and any other details.
